Decoupled Migration: A Deep Dive into Migrating Large E-commerce Websites Page by Page with Edgio v6
Migrating a large e-commerce website can be a complex process, but with Edgio v6, you have the advantage of migrating page by page with enhanced granularity. This tutorial will guide you through the entire process of migrating your e-commerce website using Edgio v6 while treating the old and new experiences as decoupled from each other.
Introduction
Before we dive into the migration process, let's start with a brief overview of Edgio v6. Edgio is a powerful platform that helps businesses manage, boost and optimize their e-commerce websites. It powers developers with Variant Split Test(s), A/B Split Test and more, configurable at a click via GUI. With Edgio v6, you have even greater control over the migration process, allowing you to migrate your website in a granular manner.
Now, let's deep dive into the migration process using Edgio v6:
Define your migration strategy: Before starting the migration, it's crucial to plan your strategy. Determine which pages or sections of your e-commerce website you want to migrate first.
Set up a production (default) environment: Create a production environment where you will serve the old experience via Edgio as a passthrough layer. Allowing you to migrate pages without affecting the current site. Explained below ↓
Set up a staging environment: Create a separate staging environment where you will serve the new experience. Allowing you to test and validate the migrated pages without affecting the live site. Explained below ↓
Create Split Testing (Migrating) Configuration: Explained below ↓
Enjoy!: Hopefully, don't need to explain how to do that :)
Disclaimer
I’m a Technical Customer Success Manager at Edgio Applications, but this is purely my ideation & work.
Terminology
- Current Experience/Site: The site that you are currently using in production and want to migrate granularly
- New Experience/Site: The site that you want to migrate to
- Production Environment: The Edgio environment where you'll deploy the current site
- Staging Environment: The Edgio environment where you'll deploy the new site/experience
Leveraging Edgio Applications
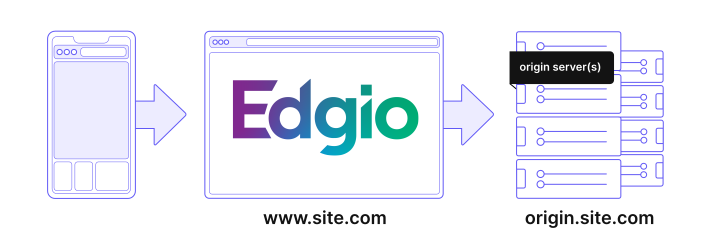
The starting point to ship speed with Edgio Applications is at their WebApp CDN guide. Overall, Edgio Applications will become the main CDN for the site/origin server (here, blog.inshorts.com). Once a response is received from the origin, it gets cached over Edgio Applications's globally distributed edge network. In browser, then those cached pages, assets, api’s, etc. can be prefetched.
I started with installing the Edgio CLI, by the following command:
# Using NPM
npm i -g @edgio/cli

# Using Yarn
yarn global add @edgio/cli
Note
While the CLI installed by the command as above will install it for v7 and above, in any app, make sure that you have @edgio packages pointing to v6.
To ensure that the version is v6, execute the folllowing at the root of your project that contains Edgio packages:
edgio use 6
Set up a production (default) environment
Creating a new project with Edgio Applications, is then just a matter of command, but I'll give you a starter to speed up your process even more:
git clone https://github.com/rishi-raj-jain/edgio-v6-migration-template
Explain: edgio.config.js
In this file, I’ve defined one backend, blog.inshorts.com as my origin. The idea is to proxy everything including assets and pages using the backend.
// File: edgio-v6-migration-template/edgio.config.js

module.exports = {
  backends: {
    origin: {
      domainOrIp: "blog.inshorts.com",
      hostHeader: "blog.inshorts.com",
      disableCheckCert: true,
    },
  },
}
Explain: routes.ts
I define all the possible paths to be to the origin (the current site).
An example of defining a route
Assume that on a website, an asset that has a relative url /l0-prodstatic/images/image/1.png is being fetched. The route below will consider the variable :path* to be images/image/1.png. Then Edgio Applications would fetch the :path* relative to the origin server as defined in the assets keys of backends in edgio.config.js. Once done, Edgio Applications would remove the set-cookie header, update the cache-contol response header and apply the cache timings.
.match('/l0-prodstatic/:path*', ({ cache, removeUpstreamResponseHeader, proxy, setResponseHeader }) => {
  setResponseHeader('cache-control', 'public, max-age=86400')
  removeUpstreamResponseHeader('set-cookie')
  cache(CACHE_ASSETS)
  proxy('origin', { path: ':path*' })
})
The whole file (routes.js)
// File: edgio-v6-migration-template/routes.ts

import { Router } from "@edgio/core/router";

export default new Router().fallback(({ proxy }) => proxy("origin"));
We’re done! Let’s deploy fearlessly now.
Emulating the production experience, locally
With Edgio Applications’s CLI, it is possible to emulate edge rules locally as if the code went live. Here’s how I did it:
edgio build && edgio run --production
Deploy
Deploying from CLI can be done as mentioned in Edgio Applications Docs
edgio deploy
Set up a staging environment
When you've deployed the production environment, you'll see this inside the Edgio Console Deployment (app.layer0.co):

Let's create a new environment named staging by clicking on + New Environment:

Great! With that done, let's deploy a Nuxt3 site to this staging environment.
Follow the guide here, and in Step 5, change the deploy command to the following:
edgio deploy -e=staging
Great, we've now setup two experiences, default and staging, the former pointing to the current site and the latter pointing to the new site.
Create Split Testing (Migration) Configuration
With both the envs' set up, let's understand the expected flow via the following diagram:

So basically, what's happening here is that a user requests comes in, based on a condition that's entered in the production env's configuration via console, the request would be either directed to the property deployed in the current (aka production) env or the staging (new) environment.
To achieve that, let's go the environments' tab, now looking as below:

Aight, let's click on the default (production) environment and go the configuration tab and click on Edit v1 at the top. Scroll down to the Split Testing section, looking as below, click on Add Rule and add a specific condition such as below to route to the new experience and the rest of the requests would automatically go to the old experience:


Great! With this done, just press on Activate to deploy the changes.
Conclusion
We saw a very straight forward method of migrating, while being able to preserve the experience and use the edge layer to switch between the environments. Read more on the official guide about it.