Building Dynamic Previews with Next.js, TailwindCSS, Chrome AWS Lambda and Edgio
This guide describes how to create dynamic images (used in web previews) with Next.js, Chrome AWS Lambda and Edgio.
Motivation
You'd want this if you are lazy enough to not make preview images by yourself for each and every piece of content that you write, that would support dark mode, come with no need to deploy more than once, and the dimensions would be resizable on the fly.

Setup Next.js
- Initialise a Next.js project by the following command:
npx create-next-app@latest dynamic-preview
- Remove _app.js and index.js inside the pages directory
- Rename hello.js under pages/api to index.js
Setup Edgio
- Install Edgio CLI with the following command:
npm i -g @edgio/cli
- Install Edgio in the project by the command:
edgio init
This will automatically add all of the required dependencies and files to your project. These include:
The @edgio/core package - Allows you to declare routes and deploy your application on Edgio.
The @edgio/next package - Provides router middleware that automatically adds Next.js pages and api routes to the Edgio router.
The @edgio/prefetch package - Allows you to configure a service worker to prefetch and cache pages to improve browsing speed.
The @edgio/react package - Provides a Prefetch component for prefetching pages.
edgio.config.js
routes.js - A default routes file that sends all requests to Next.js. Update this file to add caching or proxy some URLs to a different origin.
sw/service-worker.js A service worker implemented using Workbox.
- If your project does not have a next.config.js file, one will automatically be added when you run edgio init. Doing so adds two plugins:
- withEdgio (required)
- withServiceWorker (optional)
If your project already has this config file, you need to add these plugins yourself.
const { withEdgio, withServiceWorker } = require('@edgio/next/config')

module.exports = withEdgio(
  withServiceWorker({
    // Output source maps so that stack traces have original source filenames and line numbers when tailing
    // the logs in the Edgio developer console.
    edgioSourceMaps: false,
  })
)
Include jsconfig.json
Create jsconfig.json at root of your project to make imports easier as following:
{
  "compilerOptions": {
    "baseUrl": ".",
    "paths": {
      "@/lib/*": ["lib/*"]
    }
  }
}
Install Chrome AWS Lambda
To make sure your app functions the same as expected with serverless functions, install puppeteer alongwith chrome-aws-lambda by command as follows:
npm i puppeteer chrome-aws-lambda // specifically puppeteer@10.4.0 chrome-aws-lambda@10.1.0
Setting up Dynamic Preview
As you might've guessed by now, we're gonna feed in html to chrome-aws-lambda, and it'll return us with the screenshot of the rendered page. To make things easier but dynamic, we can accept query parameters such as width, height, title, author, mode, embedImage to create the html on the fly. After you're done figuring out how you want the preview images to look like, replace the contents in pages/api/index.js to the following:
import chromium from 'chrome-aws-lambda'

export default async function handler(req, res) {
  const {
    title,
    image,
    mode = false, // default as light mode
    width = 1400, // default width as 1400px
    height = 720, // default width as 720px
  } = req.query

  // Your dynamic html
  const dom = generatePage(title, image, mode)

  // Load Chromium
  const browser = await chromium.puppeteer.launch({
    args: chromium.args,
    defaultViewport: chromium.defaultViewport,
    executablePath: await chromium.executablePath,
    headless: chromium.headless,
    ignoreHTTPSErrors: true,
  })

  // Wait for the page
  const page = await browser.newPage()

  // Set height and width of the page
  await page.setViewport({
   width: parseInt(width),
   height: parseInt(height)
  })

  // Pass dynamic html to the page
  await page.setContent(dom)

  // Set timeout so that all the resources load
  await page.waitForTimeout(10000) // wait for the page to get rendered
  const content = await page.$('body')
  const imageBuffer = await content.screenshot({ omitBackground: true })
  await page.close()
  await browser.close()

  // Cache Forever
  res.setHeader(
    'Cache-Control',
    `public, immutable, no-transform, s-maxage=31536000, max-age=31536000`
  )

  // Send the response as an image
  res.setHeader('Content-Type', 'image/png')
  res.send(imageBuffer)
  res.status(200)
}
Deploy to Edgio
Deploying requires an account on Edgio. Sign up here for free. Once you have an account, you can deploy to Edgio by running the following in the root folder of your project:
edgio deploy
See deploying for more information.
Optional: More on creating your dynamic pages
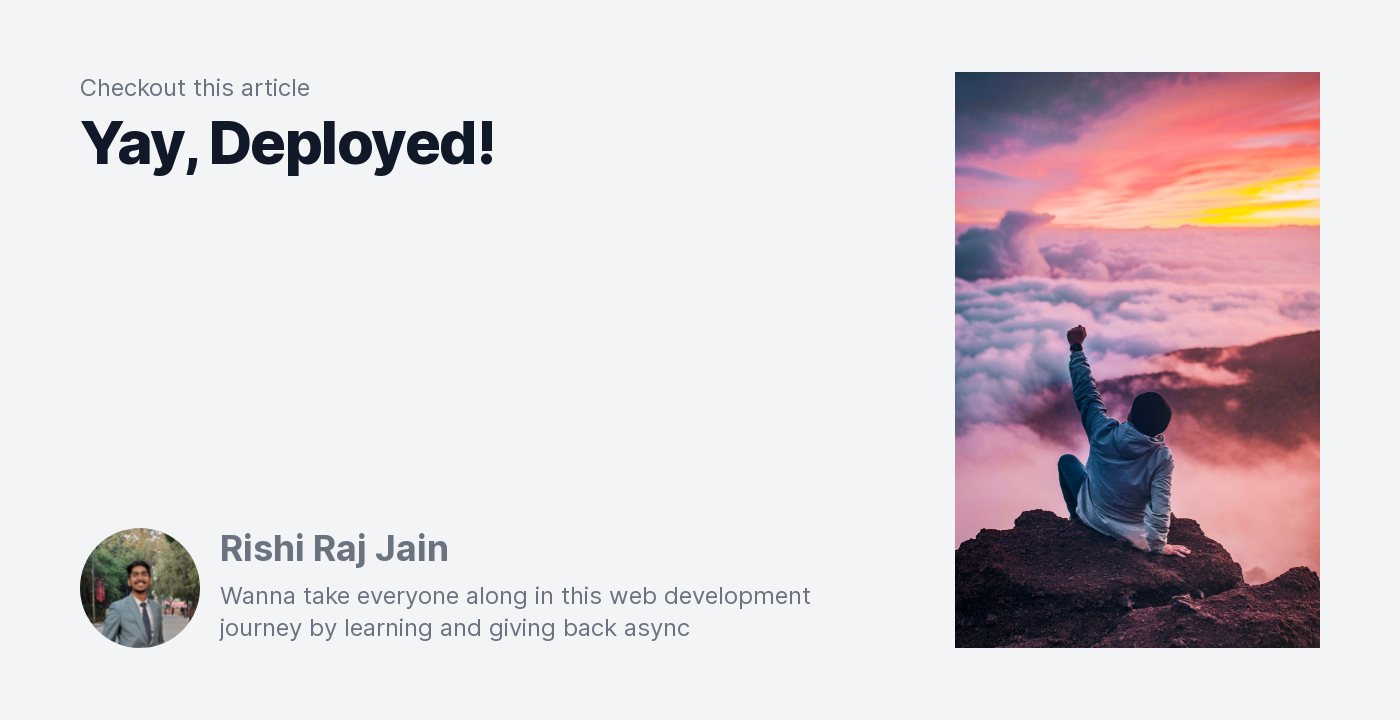
The following function is used to create dynamic html(s). Play around TailwindCSS to visualise how previews would look like at Play TailwindCSS.
// File: @/lib/dom.js

export function dom(title, image, mode) {
  return `
        <html>
            <head>
                <link
                    rel="stylesheet"
                    href="https://fonts.googleapis.com/css2?family=Inter:wght@400;500;600;700;800;900&display=swap"
                />
                <link
                    rel="stylesheet"
                    href="https://unpkg.com/tailwindcss@^2/dist/tailwind.min.css"
                />
                <style>
                    body {
                        font-family: Inter, ui-sans-serif, system-ui, -apple-system, BlinkMacSystemFont, "Segoe UI", Roboto, "Helvetica Neue", Arial, "Noto Sans", sans-serif, "Apple Color Emoji", "Segoe UI Emoji", "Segoe UI Symbol", "Noto Color Emoji";
                        background-image: radial-gradient(#C1C1C1 0%, transparent 20%), radial-gradient(#C1C1C1 0%, transparent 20%);
                        background-color: #FFFFFF;
                        background-position: 0 0, 10px 10px;
                        background-size: 10px 10px;
                        width: 100%;
                        height: 100%;
                        padding: 0px;
                        margin: 0px;
                    }
                </style>
            </head>
            <body>
                <div class="flex flex-row px-10 items-center justify-center h-screen w-screen ${mode ? 'bg-gray-900' : 'bg-gray-100'}">
                    <div class="px-5 py-0 m-0 w-4/5 h-4/5 flex flex-col">
                        <h5 class="text-2xl text-gray-500">
                            Checkout this article
                        </h5>
                        <h1 class="mt-2 text-4xl sm:text-6xl leading-none font-extrabold tracking-tight ${mode ? 'text-white' : 'text-gray-900'}">
                            ${title}
                        </h1>
                        <div class="flex flex-row items-start mt-auto">
                            <img src="https://rishi.app/static/favicon-image.jpeg" class="rounded-full" style="width: 120px; height: 120px;" />
                            <div class="ml-5 flex flex-col">
                                <h6 class="font-bold text-4xl ${mode ? 'text-gray-300' : 'text-gray-500'}">
                                    Rishi Raj Jain
                                </h6>
                                <p class="text-2xl text-gray-500">
                                    Wanna take everyone along in this web development journey by learning and giving back async
                                </p>
                            </div>
                        </div>
                    </div>
                    <div class="p-0 m-0 w-2/5 h-4/5">
                        <img src="${image}" class="object-cover h-full" />
                    </div>
                </div>
            </body>
        </html>
    `
}